Unmanaged OSDisk with Managed Data disk - AzureVM

Yesterday there was one scenario where my customer asked me to attach a managed disk to the AzureVM and when i oped the portal thought its just a single VM and click on the add disk , i did not get any option to create and attach the managed disk.

When i couldnt do it from Portal i thought lets try with Powershell. I created all the cmdlets and ran it and then absolute clear Error ever come up on my scree stating


  " Managed disk not supported on Unmanaged OS disk  & Vice Versa"


So yes this is not possible , Now seems like very short post , ok lets see few difference between Managed and unmanaged disk

  Essentially, Managed Disks are easier to use because they don't require you to create a storage       account. The benefit of not having to manage a storage account is that storage accounts have limits, like max IOPS, so that if you place too many disks in a storage account, it is possible that you will reach the IOPS limit. (500 * 40 = 20000 IOPS which is provided by one storage account so not more then 40 disks/ storage account )

 if you have VMs in an Availability Set, Azure will make sure that disks are on different "stamps" ensuring that disks are spread out so that you don't have a single point of failure for the Managed disks.

When taking snapshots of managed disk they are Full Snapshots, not incremental, so this adds to storage cost.

Managed disk only supports LRS.
Azure VM image availability via PS

There are situations and scenerios where we need to check weather particular image is available in certain location or not, is certain image available in the market place or not and so many other where we need to dig out Image , Publisher , offer etc etc.

So below is the few cmdlets which can help you figure out image or publisher or version as per your requirement.


$locName="West US"
$pubName="MicrosoftWindowsServer"

Get-AzVMImagePublisher -Location $locName | Select PublisherName

$offerName="WindowsServer"

Get-AzVMImageSku -Location $locName -PublisherName $pubName -Offer $offerName | where { $_.Skus -like '*Smalldisk'}

$skuName="2016-Datacenter-smalldisk"

Get-AzVMImage -Location $locName -PublisherName $pubName -Offer $offerName -Sku $skuName | Select Version

Get-AzVMImagePublisher -Location $locName | Select PublisherName


$version = "2016.127.20190603"

Get-AzVMImage -Location $locName -PublisherName $pubName -Offer $offerName -Skus $skuName -Version $version

How to get the internet working on AzureVM's behind Internal Standard LB

I am pretty sure people has seen this issue , well yes i did encounter this one when establishing internal standard LN for one of my customer and back-end machines lost the internet connectivity.

Before we go ahead and fix this issue and talk about few interesting point lets understand Standard Load Balancer first -

  Azure Load Balancer allows you to scale your applications and create high availability for your services. Load Balancer can be used for inbound as well as outbound scenarios and provides low latency, high throughput, and scales up to millions of flows for all TCP and UDP applications.

Standard Load Balancer is a new Load Balancer product for all TCP and UDP applications with an expanded and more granular feature set over Basic Load Balancer.

While Basic Load Balancer exists within the scope of an availability set, a Standard Load Balancer is fully integrated with the scope of a virtual network and all virtual network concepts apply.

Well will be discussing comparison in next post for now lets fix the issue as stated above.

To fix the backend VM's internet issue - you need to create one more standard Public LB and create the outbound rule which would allow the backend VM's talk to the internet via Public ip of LB.

When you configure backend pool if your VM has basic public Ip it wouldnt show to configure.
Backend VM's either should not have public IP or should have Standard Public IP.


you can create outbound rule via Azure CLI

az network lb outbound-rule create \
 --resource-group yourRG \
 --lb-name yourlb \
 --name outboundrule \
 --frontend-ip-configs yourfrontendip \
 --protocol All \
 --idle-timeout 15 \
 --outbound-ports 10000 \
 --address-pool your outboundpool

for details you can check the below link


https://docs.microsoft.com/en-us/azure/load-balancer/configure-load-balancer-outbound-cli


Azure VM Stuck

This happened with me alot of times as subject says AzureVM stuck , now thing is Azure VM gets stuck either in Starting , deallocating or in running state, it could be anything.

If machine is in starting or deallocating state then giving little time also helps sometimes or try to stop or start programmatically i.e Powershell or cloudshell , sometimes this works but the ultimate trick are below -

  1. Re-size the VM and always try to re-size larger what is current.
  2. Re-deploy the VM from the portal.

In both the above cases the underlying host changes which helps VM to come up fine.

There are situations where VM shows running perfectly fine on the portal and when you get the status via powershell it says succeeded and running but still you are unable to ping , unable to login and boot diagnostic shows login screen. Even in this situation above mentioned 2 solution helps.

Now if everything is failed and you want the VM up and running as there could be business loss or other reasons then the best option is - Delete the VM and re-create it from the disk. 


https://docs.microsoft.com/en-us/azure/virtual-machines/troubleshooting/

Storage Life Cycle Management

Life-cycle management of Azure blob gives you ability to manage your blobs as per the blob requirement or data use by which you can transition your data from Hot tier >> cold  >> archive and delete eventually.

Life management policy :

Transition blobs to hot to cold and cold to archive in order to optimize performance and cost.
Delete blobs at the end of their life-cycles
Define up to 100 rules
Run rule automatically once a day
Apply rules to containers or specific blobs or folders up to 10 prefixes per rule.


Life Cycle  Management policy is available for GPv2 and Blob storage accounts only.
You can upgrade GPv1 to GPv2 and utilize the policies.

This is free of cost service and available in all regions.

Below is the code by which you can easily create and apply your rule or policies.

#Initialize the following with your resource group and storage account names
$rgname = "brg"
$accountName = "lifecyclepol"

#Create a new action object
$action = Add-AzStorageAccountManagementPolicyAction -BaseBlobAction Delete -daysAfterModificationGreaterThan 30
$action = Add-AzStorageAccountManagementPolicyAction -InputObject $action -BaseBlobAction TierToArchive -daysAfterModificationGreaterThan 2
$action = Add-AzStorageAccountManagementPolicyAction -InputObject $action -BaseBlobAction TierToCool -daysAfterModificationGreaterThan 1
$action = Add-AzStorageAccountManagementPolicyAction -InputObject $action -SnapshotAction Delete -daysAfterCreationGreaterThan 3

# Create a new filter object
# PowerShell automatically sets BlobType as “blockblob” because it is the only available option currently
$filter = New-AzStorageAccountManagementPolicyFilter -PrefixMatch ab,cd

#Create a new rule object
#PowerShell automatically sets Type as “Lifecycle” because it is the only available option currently
$rule1 = New-AzStorageAccountManagementPolicyRule -Name Test -Action $action -Filter $filter

#Set the policy
$policy = Set-AzStorageAccountManagementPolicy -ResourceGroupName $rgname -StorageAccountName $accountName -Rule $rule1


Once you run above code you need to go to the Storage account >> Blob service >> Lifecycle management and you can see your rule. You can also create rule from there as well. Below are the snippets -


Azure Bastion Host

Azure Bastion is amazing service which is in public preview and soon be in GA. I must say it would take alot of overhead burden of Jump server, you must be wondering why so its just Bastion

Well for starters - its PaaS service so you need to bother for maintaining Jump box that includes Patching , NSG's, Public IP etc etc.

It provides secure and seamless RDP/SSH connectivity to your VM's directly in the Azure portal over SSL.

When you connect via Bastion your VM doesnt need Public IP Address, doesn't need additional agent pt any piece of software.

You are not exposing your VM's to public internet so your VM's automatically protected again port scanning by malicious users.

Things to keep in mind while creating Azure Bastion :

  • You can create from Public preview link or register the provider.
  •  You need a subnet of /27 with name AzureBastionSubnet
  • It takes little more time than VM creation may be because its in Preview.
  • While creating you need to select the Vnet where you want o place it.
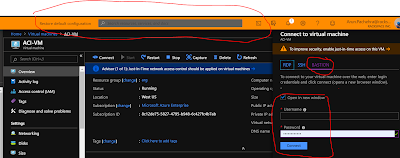
  • Once created you need to go to that VM that you want to connect to and once you hit connect you would have Bastion option where you need to put your credential and RDP will open in the browser.
  • You only need to allow the RDP on NSGs from Bastion

Now lets register the provider and create Bastion :


Register-AzProviderFeature -FeatureName AllowBastionHost -ProviderNamespace Microsoft.Network

Register-AzResourceProvider -ProviderNamespace Microsoft.Network

Get-AzProviderFeature -FeatureName AllowBastionHost -ProviderNamespace Microsoft.Network


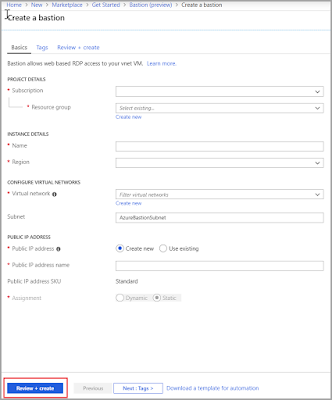
Now go to the Azure portal - preview and create Bastion 

You need to fill the below details -


Once created you go to any VM that you want to connect via Bastion and you would have following options to work with , and your RDP will open in the browser.


Architect Azure Environment - Efficiency & Operations

This is the last but not the least point that we should keep in mind while designing any Azure environment. We would go in detail in latter post but for now we would understand how and why efficiency & operations are important for us.

Efficiency as name suggest is all about utilizing efficiently and eliminating waste with in your environment. 

Cloud is all about paying for what you use and you can easily figure out what all resources you don't need or turn down the capacity as required as typically waste comes from provisioning more capacity than demand requires.

Few e.g. of waste :
  • A virtual machine that is always 90% idle
  • Paying for a license included in a virtual machine when a license is already owned
  • Retaining infrequently accessed data on a storage medium optimized for frequent access
  • Manually repeating the build of a non-production environment

Operationally, it's important to have a robust monitoring strategy. This helps you identify areas of waste, troubleshoot issues, and optimize the performance of your application.


Azure VM Disk Caching

Azure VM Disk types :

there are 3 types of disk used with Azure VM's

OS Disk - azure automatically attaches a vhd for the OS when we create VM.

Temporary disk - azure automatically assigns temporary disk when we create VM. This storage is present on the phycical machine that is hosting your VM & your VM can move to a different host any point in time due to various reasons like hardware failure or re-deploy & your data may loose. This disk is used for data, such as page and swap files.

Data Disk - its a vhd that we attach to store data , additional disk.


Caching Option for Azure VM's

Caching utilizes the local RAM and SSD drives on underlying VM host.

there are 3 common options for VM disk caching :

Read/write - Write-back cache. Use this option only if your application properly handles writing cached data to persistent disks.

Read-only - Reads are done from the cache hence it improves latency and potentially gain higher IOPS per disk

None - No cache. select this option for write-only and write-heavy disks. log files are a good candidate bacuse they write heavy operations.

Disk caching options can't be changed for L-Series and B-series virtual machines.


Performance considerations:

OS Disk :-

Default behaviour is to use cache in read/write mode

if you have application that store data files on the OS disk and also does lots of randome read / write operations to the data files, consider moving those files to a data disk that has the caching turned off, because if the read queue does not contain sequential reads, caching will be of little or no benefit.

Overhead of maintaining the cache, as of the data was sequential, can reduce disk performance.


Data Disk :-

For performance-sensitive applications, you should use data disks rather than the os disk. Using separate disks allows you to configure the appropriate cache settings for each one.

For e.g  Azure VM running SQL Server , enabling Read-only caching on the data disk can result in the significant performance improvements. Log files on the other hand are good candidate for the data disk with no caching.


Changing Caching Option via Powershell :

Simple 3 line code can help you change the caching of the disk.

$vm = get-azvm -ResourceGroupName "RGName" -Name "VMName"

$vm.StorageProfile.DataDisks

Set-AzVMDataDisk -vm $vm -Name "diskname" -Caching ReadWrite | Update-AzVM


you can also use portal to do that go to VM >> Disk >> click edit and change the option there.

Below link would give the detailed information -

https://docs.microsoft.com/en-us/azure/virtual-machines/windows/premium-storage-performance


Move/Copy Snapshot from one region to another

We all know we have ASR to move VM from one region to another but there are situations where we have to use manual approach via PS to move the snapshot from one region to another into a VHD and create either snapshot or disk or VM eventually with the help of that. In the previous post we have already discussed how to do the last part i mentioned .i.e creation of disk from VHD and VM from Disk and in today's post we are discussing copying snapshot from one region to another into a VHD.
Below PS Code would help you -


$ResourceGroupName = "RG"
$SnapshotName = "snapshotname"
$sasExpiryDuration = "15000"
$storageAccountName = "destinationstorageaccountname"
$storageAccountKey = "Accesskey"
$storageContainerName = "containername"
$destinationVHDFileName = "Vhdname"

#create the sas token to access snapshot
$sas = Grant-AzSnapshotAccess -ResourceGroupName $ResourceGroupName -SnapshotName $SnapshotName  -DurationInSecond $sasExpiryDuration -Access Read

#Create the context for the storage account which will be used to copy snapshot to the storage account
$destinationContext = New-AzStorageContext -StorageAccountName $storageAccountName -StorageAccountKey $storageAccountKey 

#Copy the snapshot to the storage account

Start-AzStorageBlobCopy -AbsoluteUri $sas.AccessSAS -DestContainer $storageContainerName -DestContext $destinationContext -DestBlob $destinationVHDFileName

Get-AzStorageBlobCopyState -Context $destinationContext -Blob $destinationVHDFileName -Container $storageContainerName

Now get-azstorageblobcopystate will give you the status of copy , it will give you pending untill copying is done and then success. Once VHD file got created at the destination , you can use that to create managed disk with the help of below code -

# create manage disk from VHD

$storageType = 'Premium_LRS'
$location = "Central Us"
$storageAccountId = "storageaccountid"
$sourceVHDURI = "VHDURI"
$resourceGroupName = 'RG'
$diskName = 'diskname'

$diskConfig = New-AzDiskConfig -AccountType $storageType -Location $location -CreateOption Import -StorageAccountId $storageAccountId -SourceUri $sourceVHDURI -OsType Windows
Â
New-AzDisk -Disk $diskConfig -ResourceGroupName $resourceGroupName -DiskName $diskName

# Creating VM from managed disk

This part you can easily perform from Portal as you would have an option of create VM on the newly created disk overview however if yo wanna use PS then you can get code here :-

https://pachehra.blogspot.com/2019/06/create-vm-grayed-out.html


Architect Azure Environment - Availability and Recoverability

Designing for availability focuses on maintaining uptime through small-scale incidents and temporary conditions like partial network outages. You can ensure your application can handle localized failures by integrating high availability into each component of an application and eliminating single points of failure.

Such a design also minimizes the impact of infrastructure maintenance.

High-availability designs typically aim to eliminate the impact of incidents quickly and automatically and ensure that the system can continue to process requests with little to no impact.

e.g. VM's in side the Availability set and load balanced by the Load Balancer.


Designing for recoverability focuses on recovery from data loss and from larger scale disasters.

These types of incidents may result in some amount of downtime or permanently lost data. Disaster recovery is as much about careful planning as it is about execution.

For recoverability, perform an analysis that examines possible data loss and major downtime scenarios that includes RPO and RTO.

  • Recovery Point Objective: The maximum duration of acceptable data loss. RPO is measured in units of time, not volume: "30 minutes of data", "four hours of data", and so on. RPO is about limiting and recovering from data loss, not data theft.
  • Recovery Time Objective: The maximum duration of acceptable downtime, where "downtime" needs to be defined by your specification. For example, if the acceptable downtime duration is eight hours in the event of a disaster, then your RTO is eight hours.
With RPO and RTO defined, you can design backup, restore, replication, and recovery capabilities into your architecture to meet these objectives.


https://pachehra.blogspot.com/2019/06/architect-azure-environment-efficiency.html

Who restarted the Azure VM


It usually happens with all of us Azure VM got rebooted suddenly and no activity was going on and we need to figure out who did this . So yes we can have the details from Azure Portal Activity log and if its done from inside we can check system logs to check who performed the action.

Below is the small script to find out who did it from inside and it shows the results as below.
It could be the possibility something wrong from Host side and machine got rebooted from backed.


 gwmi win32_ntlogevent -filter "LogFile='System' and EventCode='1074' and Message like '%restart%'" | select User,@{n="Time";e={$_.ConvertToDateTime($_.TimeGenerated)}}


User                Time
----                ----
NT AUTHORITY\SYSTEM 6/12/2019 1:18:03 PM
POWER\azadmin       6/12/2019 1:16:14 PM

POWER\azadmin       5/14/2019 10:04:41 AM


The VM is hosted on a physical server that is running inside an Azure datacenter. The physical server runs an agent called the Host Agent in addition to a few other Azure components. When these Azure software components on the physical server become unresponsive, the monitoring system triggers a reboot of the host server to attempt recovery. The VM is usually available again within five minutes and continues to live on the same host as previously.

Because some host server faults can be specific to that server, a repeated VM reboot situation might be improved by manually redeploying the VM to another host server. This operation can be triggered by using the redeploy option on the details page of the VM, or by stopping and restarting the VM in the Azure portal.

Create VM option is Grayed out - Azure Disk

Well this was fun , We could easily create VM from Portal if we have disk already & i have done it so many times until i encounter this scenario which made me go through PS code twice and fortunately i could figure out what the problem is & why "create VM" is grayed out.

here the picture for you all and you could relate now -


Once you look at the picture you could see Create VM is grayed out and if you look again you will find Operating System option is also blank that is the issue which is not allowing disk to create VM.

If i will be more accurate , Azure is treating this Disk as Data disk not OS Disk hence there is no Option or grayed out option for Create VM.

Resolution : It can easily be fixed if you add one more command in your PS Code .i.e  -OsType

below is the code to create disk from VHD and we have selected -OsType Windows that helped us to fix the problem.

$storageType = 'Premium_LRS'
$location = "Central Us"
$storageAccountId = 'youstoragaeaccountID'
$sourceVHDURI = "yourvhduri"
$resourceGroupName = 'RG'
$diskName = 'yourdiskname'

$diskConfig = New-AzDiskConfig -AccountType $storageType -Location $location -CreateOption Import -StorageAccountId $storageAccountId -SourceUri $sourceVHDURI -OsType Windows 

New-AzDisk -Disk $diskConfig -ResourceGroupName $resourceGroupName -DiskName $diskName


Second Resolution is creating VM with the help PS Code , only then you could utilize this disk & below is the code that would help you -

$resourceGroupName = " name of your resource group"
$diskName = " name of the Managed Disk "
$location = " location should be same as the Managed Disk location"
$virtualNetworkName  = " name of an existing virtual network where virtual machine will be created"
$virtualMachineName  = " name of the virtual machine"
$virtualMachineSize = '' Size available in region and required"


$disk =  Get-AzDisk -ResourceGroupName $resourceGroupName -DiskName $diskName

$VirtualMachine = New-AzVMConfig -VMName $virtualMachineName -VMSize $virtualMachineSize

$VirtualMachine = Set-AzVMOSDisk -VM $VirtualMachine -ManagedDiskId $disk.Id -CreateOption Attach -Windows


#Create a public IP for the VM  (optional)
$publicIp = New-AzPublicIpAddress -Name ($VirtualMachineName.ToLower()+'_ip') -ResourceGroupName $resourceGroupName -Location $location -AllocationMethod Dynamic

$vnet = Get-AzVirtualNetwork -Name $virtualNetworkName -ResourceGroupName $resourceGroupName

$VirtualMachine = Add-AzVMNetworkInterface -VM $VirtualMachine -Id $nic.Id

New-AzVM -VM $VirtualMachine -ResourceGroupName $resourceGroupName -Location $location


Hope this post would save you some time and helped you fixing your issue. 

Architect Azure Environment - Performance & Scalability

Scaling and performance optimization are about matching the resources available to an application with the demand it is receiving. Performance optimization includes scaling resources, identifying and optimizing potential bottlenecks, and optimizing your application code for peak performance.

Scaling

Compute resources can be scaled in two different directions:

  • Scaling up is the action of adding more resources to a single instance like CPU, memory etc.
  • Scaling out is the addition of instances.

Performance optimization

When optimizing for performance, you'll look at network and storage to ensure performance is acceptable. Both can impact the response time of your application. Selecting the right networking and storage technologies for your architecture will help you ensure you're providing the best experience for your consumers.

Performance optimization will also include understanding how the applications themselves are performing. Errors, poorly performing code, and bottlenecks in dependent systems can all be uncovered through an application performance management tool.

Scalability and performance patterns and practices


1. Caching

Use caching in your architecture can help improve performance. Caching is a mechanism to store frequently used data or assets (web pages, images) for faster retrieval. Caching can be used at different layers of your application. You can use caching between your application servers and a database, to decrease data retrieval times. You could also use caching between your end users and your web servers, placing static content closer to the user and decreasing the time it takes to return web pages to the end user. This also has a secondary effect of offloading requests from your database or web servers, increasing the performance for other requests.

2. Autoscaling

Autoscaling is the process of dynamically allocating resources to match performance requirements and can be de-allocated when no longer needed.

3. Decouple resource-intensive tasks as background jobs

Many types of applications require background tasks that run independently of the user interface (UI). Examples include batch jobs, intensive processing tasks, and long-running processes such as workflows. Background jobs can be executed without requiring user interaction--the application can start the job and then continue to process interactive requests from users. This can help to minimize the load on the application UI, which can improve availability and reduce interactive response times.

4. Use a messaging layer between services

Adding a messaging layer in between services can have a benefit to performance and scalability. Adding a messaging layer creates a buffer for requests between the services so that requests can continue to flow in without error if the application can’t keep up. As the application works through the requests, they will be answered in the order in which they were received.

5. Performance monitoring

Look across all layers of your application and identify and remediate performance bottlenecks in your application. These bottlenecks could be poor memory handling in your application, or even the process of adding indexes into your database. It may be an iterative process as you relieve one bottleneck and then uncover another that you were unaware of.

6. Data partitioning

In many large-scale solutions, data is divided into separate partitions that can be managed and accessed separately. The partitioning strategy must be chosen carefully to maximize the benefits while minimizing adverse effects. Partitioning can help improve scalability, reduce contention, and optimize performance.


https://pachehra.blogspot.com/2019/06/avarec.html

Architect Azure Environment - Security Design

A multilayered approach to securing your environment will increase the security posture of your environment. Commonly known as defense in depth, we can break down the layers as follows:
  • Data
  • Applications
  • VM/compute
  • Networking
  • Perimeter
  • Policies & access
  • Physical security

Each layer focuses on a different area where attacks can happen and creates a depth of protection Addressing security in layers increases the work an attacker must do to gain access to your systems and data. 

Each layer will have different security controls, technologies, and capabilities that will apply. When identifying the protections to put in place, cost will often be of concern, and will need to be balanced with business requirements and overall risk to the business.

At each layer, there are some common attacks that you will want to protect against. These are not all-inclusive, but can give you an idea of how each layer can be attacked and what types of protections you may need to look at :-

Data layer: Exposing an encryption key or using weak encryption can leave your data vulnerable should unauthorized access occur.

Application layer: Malicious code injection and execution are the hallmarks of application-layer attacks. Common attacks include SQL injection and cross-site scripting (XSS).

VM/compute layer: Malware is a common method of attacking an environment, which involves executing malicious code to compromise a system. Once malware is present on a system, further attacks leading to credential exposure and lateral movement throughout the environment can occur.

Networking layer: Unnecessary open ports to the Internet are a common method of attack. These could include leaving SSH or RDP open to virtual machines. When open, these could allow brute-force attacks against your systems as attackers attempt to gain access.

Perimeter layer: Denial-of-service (DoS) attacks are often seen at this layer. These attacks attempt to overwhelm network resources, forcing them to go offline or making them incapable of responding to legitimate requests.

Policies & access layer: This is where authentication occurs for your application. This could include modern authentication protocols such as OpenID Connect, OAuth, or Kerberos-based authentication such as Active Directory. Exposed credentials are a risk here and it's important to limit the permissions of identities. We also want to have monitoring in place to look for possible compromised accounts, such as logins coming from unusual places.

Physical layer: Unauthorized access to facilities through methods such as door drafting and theft of security badges can be seen at this layer.


Your data may be subject to additional legal and regulatory requirements depending on where you are located, the type of data you are storing, or the industry that your application operates in :

Health Insurance Portability and Accountability Act (HIPAA) - healthcare industry in the US

In Europe, the General Data Protection Regulation (GDPR) lays out the rules of how personal data is protected, and defines individuals' rights related to stored data.

In the financial industry, the Payment Card Industry Data Security Standard is concerned with the handling of credit card data

Architect Azure Environment - Things to keep in Mind

There are many ways by which people design their Cloud Architecture and there nothing wrong with it until it works for you however there are concepts which remain same for any great cloud architect.

An Architect must focus his design as per these 4 important concepts :

- Security
- Performance and Scalability
- Availability and Recoverability  
- Efficiency and Operations


In an ideal architecture, we would build the most secure, high performance, highly available, and efficient environment possible. However, as with everything, there are trade-offs. To build an environment with the highest level of all these pillars, there is a cost. That cost may be in actual money, time to deliver, or operational agility. Every organization will have different priorities that will impact the design choices made in each pillar. As you design your architecture, you will need to determine what trade-offs are acceptable and which are not.

When building an Azure architecture, there are many considerations to keep in mind. You want your architecture to be secure, scalable, available, and recoverable. To make that possible, you'll have to make decisions based on cost, organizational priorities, and risk

This is the absolute basic for any architecture and will be posting each concept in little more detail in upcoming posts.


https://pachehra.blogspot.com/2019/06/architect-azure-environment-security.html

ASR A2A Connectivity Requirements

The Azure VMs you replicate need outbound connectivity. Site Recovery never needs inbound connectivity to the VM.

Outbound connectivity (URLs)

If outbound access for VMs is controlled with URLs, allow these URLs.


URL Details
*.blob.core.windows.net Allows data to be written from the VM to the cache storage account in the source region.
login.microsoftonline.com Provides authorization and authentication to Site Recovery service URLs.
*.hypervrecoverymanager.windowsazure.com Allows the VM to communicate with the Site Recovery service.
*.servicebus.windows.net Allows the VM to write Site Recovery monitoring and diagnostics data.


Outbound connectivity for IP address ranges

To control outbound connectivity for VMs using IP addresses, allow these addresses.

Source region rules

Rule Details Service tag
Allow HTTPS outbound: port 443 Allow ranges that correspond to storage accounts in the source region Storage.<region-name>.
Allow HTTPS outbound: port 443

Allow ranges that correspond to Azure Active Directory (Azure AD).

If Azure AD addresses are added in future you need to create new Network Security Group (NSG) rules.
AzureActiveDirectory


Allow HTTPS outbound: port 443


Allow access to Site Recovery endpoints that correspond to the target location.


Target region rules

Rule Details Service tag
Allow HTTPS outbound: port 443 Allow ranges that correspond to storage accounts in the target region. Storage.<region-name>.


Allow HTTPS outbound: port 443
Allow ranges that correspond to Azure AD.

If Azure AD addresses are added in future you need to create new NSG rules.
AzureActiveDirectory


Allow HTTPS outbound: port 443


Allow access to Site Recovery endpoints that correspond to the source location.


NSG rules for the source Azure region should allow outbound access for replication traffic.

ASR Replication Policy and Process (Azure-2-Azure)

When you enable Azure VM replication, by default Site Recovery creates a new replication policy with the default settings as below :


Policy setting Details  Default
Recovery point retention Specifies how long Site Recovery keeps recovery points 24 hours
App-consistent snapshot frequency How often Site Recovery takes an
app-consistent snapshot.
Every 60 minutes.


* You can modify the default replication policy settings when you enable replication.


Replication Process :

When you enable replication for an Azure VM, the following happens:
  1. The Site Recovery Mobility service extension is automatically installed on the VM.
  2. The extension registers the VM with Site Recovery.
  3. Continuous replication begins for the VM. Disk writes are immediately transferred to the cache storage account in the source location.
  4. Site Recovery processes the data in the cache, and sends it to the target storage account, or to the replica managed disks.
  5. After the data is processed, crash-consistent recovery points are generated every five minutes. App-consistent recovery points are generated according to the setting specified in the replication policy

Multi-VM Consistency :

If you want VMs to replicate together, and have shared crash-consistent and app-consistent recovery points at failover, you can gather them together into a replication group. Multi-VM consistency impacts workload performance, and should only be used for VMs running workloads that need consistency across all machines.

If you enable multi-VM consistency, machines in the replication group communicate with each other over port 20004.
  • Ensure that there is no firewall appliance blocking the internal communication between the VMs over port 20004.
  • If you want Linux VMs to be part of a replication group, ensure the outbound traffic on port 20004 is manually opened as per the guidance of the specific Linux version.


Check the crash-consistent and app-consistent recovery points here :

https://pachehra.blogspot.com/2019/06/rp.html


Crash-consistent and App-consistent Recovery Points


It happens alot of time with me in the bay while working what kind of snapshot we choose to restore machine or recover machine with , well there was the time when i wasn't aware and i was like doesn't matter because in my cases it always worked but i was wrong and yes there is difference between them and has different use cases.

So will see what the difference between them and what should we use -


Crash-consistent 

 As the name suggests this snapshot is pretty good if your machine got crashed or you want to recover machine either via recovery services during ASR replication or restore from backup because this is the snapshot of your disk.

It captures data at that particular time which was on the disk.

It doesn't include anything in-memory

This doesn't guarantee data consistency for the OS or for apps on the VM.

* Site Recovery creates crash-consistent recovery points every 5 mins by default & cant be modified.

Most of the apps can easily recover well from crash consistent points, its usually sufficient for replicating OS , apps like DHCP servers and print servers.


App-Consistent

As name suggest its more app oriented snapshots that means it contains all the data that crash-consistent contains plus all the data in memory and transactions in progress.

App-consistent snapshot uses Volume Shadow Copy Service (VSS)

When a snapshot initiated, VSS performs a copy-on-write ( COW ) operation on the volume & before it perform the COW , VSS informs every app on the machine that it needs to flush its memory-resident data to disk.

App-consistent snapshot is complex as compare to others and takes longer time.

They affect the performance of apps running on a VM enabled for replication.

* frequency should always be less than you set for retaining recovery points.


ASR uses the above mentioned recovery points or snapshots :

Recovery points are created from snapshots of VM disks taken at a specific point in time. When you fail over a VM, you use a recovery point to restore the VM in the target location.

When failing over, we generally want to ensure that the VM starts with no corruption or data loss, and that the VM data is consistent for the operating system, and for apps that run on the VM. This depends on the type of snapshots taken.

(ASR) Site Recovery takes snapshots as follows:


  1. Site Recovery takes crash-consistent snapshots of data by default, and app-consistent      snapshots if you specify a frequency for them.
  2. Recovery points are created from the snapshots, and stored in accordance with retention settings in the replication policy.


Check replication process and policy with respect to Azure 2 Azure DR

https://pachehra.blogspot.com/2019/06/asr-rep.html

https://pachehra.blogspot.com/2019/06/asrconnreq.html


Git Basics

Now a days Git is something what everybody heard in the field of IT. Its all because cloud computing provides very relevant environment to perform or follow the DevOps culture and Git is a big part of it

Git is a distributed Version Control system for tracking changes in the source code during software development.

Git is open source and designed to handle everything from small to very large projects with speed and agility. It gives programmers a hassle free environment because of branching system what that means that people can create there branch out of the master branch and work on it rather messing around the master code.

Lets see the basic commands of Git that would help you work on this part of SCM "software configuration management"


git config 

This command used to set the user name and email address of author to the commits .e.g

git config --global user.name "Pachehra"
git config --global user.email "cloud.pachehra@gmail.com"

Now you have set the user name and email address & you want to check what user name and email associated with the session you can check by below commands -

git config --global user.name
git config --global user.email


git init

This command used to initiate the git repository or after running this command you can find .git folder in the repository.


git clone

This command used to clone the existing project with the help of URL .e.g

git clone https://github.com/Pachehra/gittest.git


git add

This command adds the file on the staging area or git starts tracking once you add the files.

git add <name of file for single file>
git add --a <for all the fine inside the folder>
git add *  <add all the file in staging>


git commit 

This command is the one which snapshot the file permanently in the version history.

git commit -m "<type message>" (for one file commit)   
git commit -a -m "type message"  (to commit all files in staging area or changed after adding in stage)


git diff

this command shows the file differences which are not yet staged means only the modified part of the file not the count to get the output you need to track or add file once.


git diff --staged

this command shows difference between staged and committed files.


git diff  <branch_1>  <branch_2>

this command will help to find the difference in the files of 2 branches.


git reset 

this command will reset the tree everything from staging area to untracked area and you cam also use commit id to reset the committed branch.

git reset  <commit id >


git status

this command that we use quite often and it list all the files which are not tracked or are in staging area or any modified file after staged.


git rm 

this command deletes or removes file from working directory and stages the deletion. Once you run the git rm command file gets remove & if you run git status you can see deleted file in stage area.


git log 

this command is used to list the version history for the current branch.


git log -follow  <file name>

this command can give you history commit of particular file.


git show <commit id>

this would show the metadata and content changes of the specified commit.


git tag  <commit id>

this command is to give tag to the specified comit.


git branch

This is to list all the local branches in the current repository.


git branch <name for branch>

this is to create new branch


git branch  -d <branch name>

this will delete the branch specified


git checkout

this will help you to switch between the branches .e.g

git checkout <branchname>
git checkout -b  <branchname>  creates branch and switch as well


git merge 

this will you merge your branch history to the current branch & merge made by recursive strategy.


git remote 

this would connect your local repository to the remote repo.


git push

this will push the committed changes to the remote repository.

git push < variable name >  <branch>  .e.g   git push origin master 
git push -all <variable name>    .e.g   git push  --all origin  
git push  <variable name > : <branch>  .e.g   git push  origin : branch


git pull 

this will fetch and merges changes on the remote server to your working directory
git pull https://github.com/Pachehra/gittest.git


git stash save

this will temporarily stash all modified tracked files


git stash pop

this will restore the most recently stashed files.


git stash drop 

this will discard most recently stashed change-set


Re-Size multiple Azure VM - Powershell

It happens many time that we need to re-size the Azure VM and its not a big deal to do it , we can easily do it from Portal. However if we need to do it for multiple VM's it becomes tiresome hence Powershell for rescue. moreover if we need to determine what all machine doesnt have the standard size even then little tweak in the below code would help us , lets check the code -

First figure out what all machine in entire subscription doesn't belong to particular size for e.g. if we need to figure out what all VM size is not "Standard_D2s_v3" . We can easily figure out by this code

$vms = get-azvm
foreach ( $vm in $vms ) {
        if ( $vm.hardwareprofile.vmsize -ne "Standard_D2s_v3") {
        write-host "need to change the size + "$($VM.name)""
      }
 }

Now if you do not want list or just want to change all the VM which doesnt belong to particular VM size you can add one more line in above code and voila !


$vms = get-azvm
$NewVMSize = "Standard_B2ms"
foreach ( $vm in $vms ) {
        if ( $vm.hardwareprofile.vmsize -ne "Standard_D2s_v3") {

        write-host "changing size + "$($VM.name)""
        $vm.HardwareProfile.vmSize = $NewVMSize
        Update-AzVM -ResourceGroupName $vm.ResourceGroupName -VM $vm

        }
        }

you can copy this code from here and use it as per your need, also you can download this from git hub below is the link -

https://github.com/ps-world/Azure-VM/blob/master/resizevm.ps1


Availability-Zone molded the design - Azure

Today my customer called and ask for the high-availability set up for the azure site and he said he wants the DR implemented too. Well i was still doing the migration from VMWare to Azure and only the initial sync was done and customer was performing the testing so that we would have the go ahead for the differential run and finally the cut-over. But suddenly due some Azure outage he got panicked and wanted us to provide HA not inside DC but HA on DC level , you right in correct he meant Availability Zone , he needed Availability Zone instead of the AV-set.

Now when we checked the availability of AV-Zone and we found it got GA recently

https://docs.microsoft.com/en-us/azure/availability-zones/az-overview

so we were like yeah that alright , we will recreate the VM's from existing disk and place them inside the AV-Zone problem solved and craft a plan for DR. But here is the kicker :


When we go through the above link just confirm we are on the right track and AV-Zone works as expected in East US but its not as per the MS Doc mentioned link above there are services which are not yet supported in East US guess what all those services were - VPN Gateway , Express Route , No paired region for DR hence the a small project become large and East US 2 got finalized because AV-Zone is pretty mature here and supports all the services.

Here is the learning ; Always check if the required services are available in particular region or not and if yes then to confirm all the Features are supported or not.

RPO and RTO Azure ASR DR

Azure Site Recovery aka ASR is well known for Disaster recovery and Migration, well here we will be discussing 2 terms which decide your DR strategy so here we will be talking about only RPO and RTO. We all have heard these terms in respect to DR set-up. Lest see what it means :

Recovery Point Objective (RPO)
In plain English it simply means , how much data customer can afford or willing to loose during DR situation or you can understand this by the frequency you are backing up your data for .e.g. if you run your backup twice at 10 am and 10 pm and disaster hits at 4PM then your RPO is 6 hours.

So we have seen RPO is usally depend upon backup policies if someone sets up a backup policy daily then RPO is closer to a day.

Recovery Time Objective (RTO)
This simply means when DR happens then how long would it take to get up and running from the time Disaster hit us.

Well its not actually possible to define actual RPO and RTO because there are several variables involved but still it is critical to understand and plan.

RPO of replication solutions are often most dependent on the distance separating the two sites.  For example, when someone configures ASR to replicate across two regions.


When designing for RTO it is important to understand the variables that are not always in your control.  For example, if someone initiates a restore, the time it takes to be back up and running is dependent on variables like the size of the restore, available network bandwidth, speed of the disk drives/VMs, etc.

Azure VM Agent

Today we will be talking about the very important application or software which makes Azure VM awesome and let it function with all the functionality we all requires like VM Extension , Password rest etc.

The Microsoft Azure Virtual Machine Agent (VM Agent) is a secure, lightweight process that manages virtual machine (VM) interaction with the Azure Fabric Controller.


The VM Agent has a primary role in enabling and executing Azure virtual machine extensions.


The Azure Virtual Machine Agent (VM Agent) provides useful features, such as local administrator password reset and script pushing. This article shows you how find out status and version of Agent.


Powershell way : 


$vms = Get-AzVM

foreach ($vm in $vms) {
    $agent = $vm | Select -ExpandProperty OSProfile | Select -ExpandProperty Windowsconfiguration | Select ProvisionVMAgent
    Write-Host $vm.Name $agent.ProvisionVMAgent
}

OSProfile                  :
  ComputerName             : myVM
  AdminUsername            : myUserName
  WindowsConfiguration     :
    ProvisionVMAgent       : True
    EnableAutomaticUpdates : True

OR

For single VM you can follow this –

 $vm = get-azvm -ResourceGroupName "Resourcegroupname" -Name "VMname"

 $vm.OSProfile.WindowsConfiguration


ProvisionVMAgent          : True
EnableAutomaticUpdates    : True
TimeZone                  : 
AdditionalUnattendContent : 
WinRM 


Manual Detection via Portal :


When logged in to a Windows VM, Task Manager can be used to examine running processes. 
To check for the Azure VM Agent, open Task Manager, click the Details tab, and look for a
process name WindowsAzureGuestAgent.exe. The presence of this process indicates that the VM agent is installed.

On portal follow : Poart > VM > Settings > Properties > Agent Status and Version


https://docs.microsoft.com/bs-latn-ba/azure/virtual-machines/extensions/agent-windows


if you have installed the agent manually after creating the image from disk or image then make sure you allow the extension operations -

$vm.OSProfile.AllowExtensionOperations = $true
$vm | Update-AzureRmVM


Supported agent versions
In order to provide the best possible experience, there are minimum versions of the agent. For more information, see this article.

Supported OSes

The Windows Guest agent runs on multiple OSes, however the extensions framework has a limit for the OSes that extensions. For more information, see this this article.


Start/Stop multiple Azure VM


There are situations where we need to start and stop the multiple AzureVM together hence the below script to cater the need. Well you can use AzureRM PS module and AZ module as well & cmdlet would change as per the module installed on your system.

Second thing to note is the that there are two ways to get the Azure VM it could belong to the same Resource group or different hence we can have below script written down in two ways. Motive here is getting the AzureVM name in the for-each loop and running the stop or start command on each VM coming out of the "if" construct.

So you need to login to Azure account first and do the necessary change as per requirement. 

Login-AzureRmAccount  # login to Azure account

$vms = gc -Path C:\computer.txt  #put name of azure vm in the text file

#$vms = (get-azurermvm -resourcegroup "rgname").name (remove #if need to pick VM from RG)

 foreach ($vm in $vms)
{
    $resource = Find-AzurermResource -ResourceNameEquals $vm -ResourceType "Microsoft.Compute/virtualMachines"
    if($resource -ne $null)
    { 
        Write-Output "Stopping virtual machine..." + $vm
        Stop-AzurermVM -ResourceGroupName $resource.ResourceGroupName -Name $vm -Force
    } 
    else
    {
        Write-output "Virtual machine not found:" + $vm
    }
}


you can also download this code from github :

https://github.com/ps-world/Azure-VM/blob/master/startstopvm.ps1


Docker and basic operational commands


Docker is a tool designed to make it easier to create, deploy, and run applications by using containers. Containers allow a developer to package up an application with all of the parts it needs, such as libraries and other dependencies, and ship it all out as one package.


Docker is a bit like a virtual machine. But unlike a virtual machine, rather than creating a whole virtual operating system, Docker allows applications to use the same kernel as the system that they're running on and only requires applications be shipped with things not already running on the host computer. This gives a significant performance boost and reduces the size of the application.


Docker is a tool which help containerizing the applications. It is a computer program that performs OS level virtualization, also known as Containerization.

Application containerization is an OS level virtualization method to deploy and run distributed applications without launching an entire virtual machines for each application. Below pic shows the construct and container engine is actually Docker.


Container doesn’t contain all the VM files but min which is needed for the app and uses the kernel of the VM that’s why its very small in size.


Above is the life cycle of the container below are the steps explained and command used :


There is central repo for docker images called dockerhub just like github.

  • Pull image in your system from docker hub
  • Run the image and it becomes container
  • Stop container or you can remove container
  • Do changes in the image or create your thing and save it with different name now its different image
  • Login to the docker first by docker login
  • Push the image to the docker hub with the naming convention username/image name

Below are few commands that you will use in daily ops :

Docker –version

Docker pull < image-name > [ To pull the image from the repo / hub]

Docker images [ To verify the images downloaded or pull]

Docker run -it -d < image-name > [run the image and make it a container]

Docker ps [ all the container running state on the server]

Docker ps -a [ show all the container running or not ]

Docker stop <container ID>  [ stopping container]

Docker exec  -it <container ID>  <bash/powershell>

Docker kill  <container ID>  [forcing to stop]

Docker stop <container ID>  [ stopping container]

Docker rm <container ID>  [ remove container from system ]

Docker rm <images ID>  [ remove images from system ]

Exit to get out of the contaimer

Docker commit <container ID >  < give name for image >

Docker push <imageid>  <imagename>


Risk Vs Constraints

 The distinction between risks and constraints lies in their nature and impact on the project. Here's how they differ: 1. Nature Risks...